This page is part of the legacy 1.0.x documentation. We recommend using the latest documentation instead.
Managing Multiple Scenes
Basic concepts:
Because the WebSpatial SDK currently offers only a React SDK, all examples in this document use React.
APIs referenced in this section:
xr_main_scenedefault_size
start_urlscope<a>window.openinitScene(),window.xrCurrentSceneDefaultsdefautSize
windowProxy.close()
A WebSpatial app always starts from a Start Scene, which loads the first web page of the current run. Starting from this page, you can open additional pages in new Scenes, so the app is composed of multiple Scenes.
Managing the Start Scene
As the starting point of the entire WebSpatial app, the Start Scene is created and initialized entirely by native code (for example, the WebSpatial App Shell). Web code only runs after this Start Scene already exists.
Therefore, the type and initialization settings of the Start Scene can be managed only in the Web App Manifest.
The WebSpatial SDK adds a new manifest property, xr_main_scene, that lets you specify initialization settings for the Start Scene.
Example from the Quick Eample:
  "start_url": "/",
  "xr_main_scene": {
    "default_size": {
      "width": 500,
      "height": 1000
    }
  }
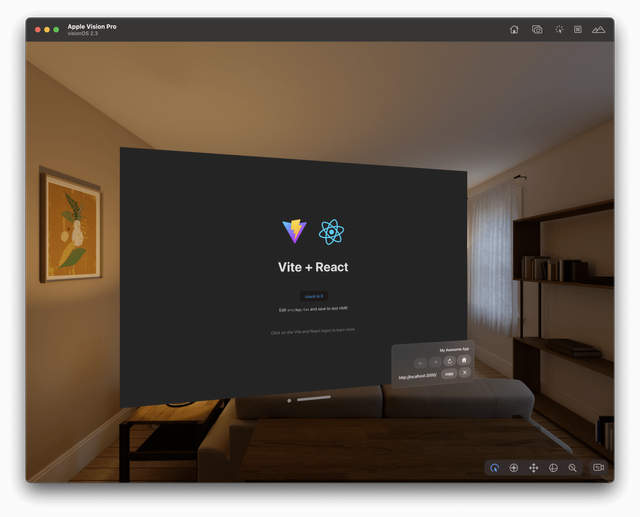
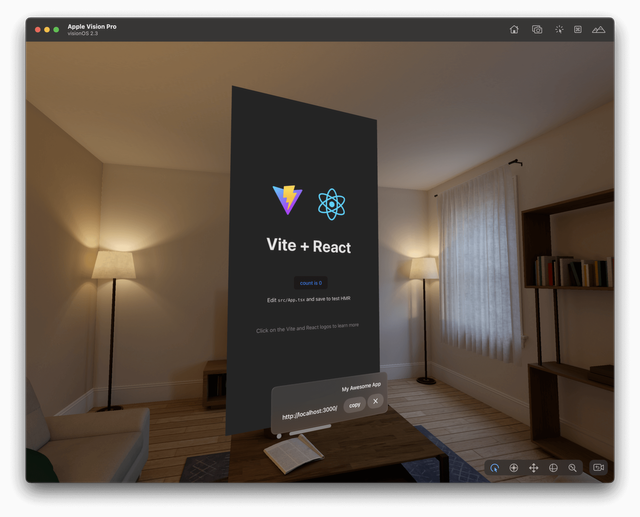
In this demo, the Start Scene originally used the size shown in the left image (landscape layout). After adding the configuration above to the Web App Manifest, the Start Scene switches to the portrait layout shown in the right image.
In the current WebSpatial SDK:
xr_main_sceneonly supports thedefault_sizesetting. More options will be added later.- Only Window Scenes are supported for now. Other Scene types such as Volume Scenes are not yet supported, so there are no manifest properties for the type of the Start Scene.
The URL loaded in the Start Scene is the first URL opened and run within the WebSpatial app.
By default, it is determined by the start_url in the Web App Manifest.
The combination of the Web App Manifest's scope and start_url clearly defines which URLs belong to this WebSpatial app.
The WebSpatial App Shell automatically registers these URLs with the system so that they open in the corresponding WebSpatial app instead of a browser.
If the app is launched from one of these URLs, the Start Scene loads that specific URL instead of the start_url.
Creating a New Scene
All later scenes in a WebSpatial app are created by web code. In the Start Scene, and in every subsequent Scene, you can create new Scenes with web code.
The method is exactly the same as opening a link in a new window on a standard website:
<a href={newSceneUrl} target="_blank"><a href={newSceneUrl} target="newSceneName">window.open(newSceneUrl);window.open(newSceneUrl, "newSceneName");
Two important notes:
- The link URL (for example,
newSceneUrlabove) must match the manifest'sscope, meaning it is part of the current WebSpatial app. Otherwise, the URL opens in the browser rather than creating a new Scene in the app. - If you supply a window name (for example,
newSceneNameabove) and a same-named Scene already exists and is still open, no new Scene is created. Instead, that Scene navigates to the new URL (equivalent to a URL jump inside the existing Scene). This behavior is the same as how multiple windows work in regular browsers.
Best practice: Once a window name has been used, continue using that name only in the same parent window. Do not reuse the name from another windows. Otherwise, according to web standards, in those windows you might either not be able to reach the same-named window, or worse, your current window might unexpectedly become the parent of that window, which breaks the original parent's access.
Example from the Quick Example:
<div className="card" style={{ marginTop: "0px" }}>
  <h2>Open Second Page</h2>
  <p>
    <Link to="/second-page" target="_blank">
      Open Second Page with a Link
    </Link>
  </p>
  <p>
    <button
      onClick={() => {
        window.open(`${__XR_ENV_BASE__}/second-page`, "secondScene");
      }}>
      Open Second Page with a Button
    </button>
  </p>
</div>
Clicking the link or the button opens new Scenes. Every Scene shows the content of /second-page, because that URL is opened in each new scene. Clicking the link multiple times produces multiple Scenes. Clicking the button multiple times produces a single Scene, because the window.open call gives it the window name "secondScene".
Because Scenes in spatial apps are centrally managed by the operating system, developers cannot arbitrarily control them. Instead, developers can only set the desired initial values for some scene properties at creation timed, the OS decides whether to honor them. After creation, these properties cannot be changed by code and are determined only by the OS and the user.
Current web standards weren't designed with spatial apps in mind, so there's no concept of scene initialization and no suitable standard API.
The
windowfeaturesparameter inwindow.openmight look like it can set window size, but those window properties can be changed at any time by code. They're not the same as scene initialization properties and not suitable here.
The WebSpatial SDK therefore provides two new APIs specifically for initializing new scenes:
initScene()
Call this API in the parent page to specify initialization settings for a soon-to-be-created scene.
import { initScene } from "@webspatial/react-sdk";

initScene("newSceneName", defaultConfig => {
  return {
    ...defaultConfig,
    defaultSize: {
      width: 900,
      height: 700,
    },
  };
});
window.open(newSceneUrl, "newSceneName");
- To use this API, the new Scene must have a name (the window name in current web standards).
- You must call this API before creating the Scene, in the same page (the parent).
- Later, you must create the Scene in the same page using the same name for the settings to take effect.
- If initialization settings are provided in advance via this API, the new Scene is created immediately, without entering a loading or waiting state.
- After the Scene exists, calling this API again with the same name does not affect the existing Scene. If you later close the existing Scene and reopen a same-named Scene from the same parent, the last settings from this API call are used.
Following the best practice above, if you provide initialization settings for a name in one page, you should only create Scenes with that name in the same page. Creating from another page can miss the settings and cause unexpected behavior.
window.xrCurrentSceneDefaults
This hook lets a web page supply initialization settings for its own Scene.
window.xrCurrentSceneDefaults = async defaultConfig => {
  const { width, height } = await requestDatabase();
  return {
    ...defaultConfig,
    defaultSize: {
      width,
      height,
    },
  };
};
- Use this API only within the page opened in the new Scene.
- It is a hook: you need to provide it before the page is ready so the WebSpatial App Shell can use it to retrieve the desired scene initialization properties from the web page.
- If no initialization properties were provided in advance, the new Scene first enters a waiting state. It loads the page in the background and, before finishing, tries to read the hook. If the hook returns properties, those are used; otherwise, defaults are used.
- If the hook returns an async function, the waiting state lasts until the function resolves or times out.
tip
One use case: the new page fetches different initialization properties from a server. For example, each article loaded from the server may have a window size suited to its content.
In the current WebSpatial SDK:
- Both APIs only support the
defaultSizesetting right now. More options will be added. - Only Window Scenes are supported for now. Other Scene types such as Volume Scenes are not yet supported, so there are no manifest properties for the type of the Start Scene.
Example based on the Quick Example:
                <h2>Open Second Page</h2>
                <p>
                  <Link
                    to="/second-page"
                    target="_blank"
                    enable-xr
                  >
                    Open Second Page with a Link
                  </Link>
                </p>
                <p>
                  <button
                    onClick={() => {
                      initScene("secondScene", prevConfig => {
                        return {
                          ...prevConfig,
                          defaultSize: { width: 500, height: 500 },
                        };
                      });
                      window.open(
                        `${__XR_ENV_BASE__}/second-page`,
                        "secondScene",
                      );
                    }}>
                    Open Second Page with a Button
                  </button>
                </p>
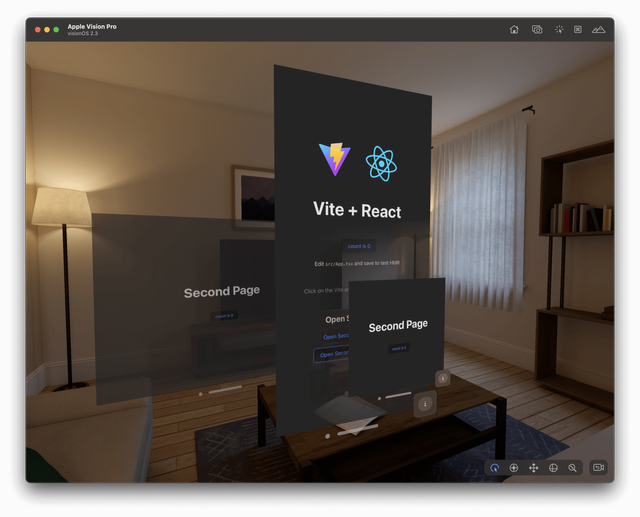
When you click the link, no window name is supplied, so no initialization properties can be provided in advance. The new Scene enters the waiting state, tries to read window.xrCurrentSceneDefaults, finds none, and is created with defaults (left window in the image).
When you click the button, initScene() supplies initialization properties for the window name "secondScene". The subsequent window.open call skips the waiting state and creates the Scene directly with those properties (right window in the image).
Managing Multiple Scenes
All Scenes after the Start Scene are created by web code, and each Scene in the app is likewise managed by web code.
After a Scene is created, the operating system controls its size and position; code cannot change these. Scene management therefore focuses on closing Scenes and passing data.
Closing is the same as closing a window on a standard website.
For any newly created Scene, it can close itself by just calling window.close() in its own page.
But the Start Scene can't close itself this way, it can only be closed by the user.
If all other Scenes in the WebSpatial app are closed and only one is left, that last Scene can't close itself too, only the user can close it manually.
If a Scene wants to close other Scenes, it can only close the ones for which it holds a window reference (WindowProxy), according to web standards.
You can capture the WindowProxy when opening the Scene and later call close() on it.
const newSceneWindowProxy = window.open(newSceneUrl);
const newSceneWindowProxy2 = window.open(newSceneUrl, "newSceneName");
newSceneWindowProxy.close();
newSceneWindowProxy2.close();
From a child scene, you can obtain the parent's WindowProxy via window.opener.
opener.close();
To send data between Scenes, continue to use existing web APIs such as:
postMessage(safe messaging between Scenes with a WindowProxy)BroadcastChannel(broadcast messages among Scenes with the same origin)MessageChannel(create a private two-way channel between two Scenes)localStorage(share data across Scenes of the same origin and listen for changes via thestorageevent)SharedWorker(let multiple same-origin Scenes share a background worker and communicate through it)